Vane's Blog

vuePress-theme-reco Vane    2018 - 2020
Vane's Blog Vane's Blog

Choose mode

  • dark
  • auto
  • light
首页
分类
  • 设计模式
  • 重新认识系列
  • 源码解析
标签
时间轴
关于
  • GitHub
  • 简书
author-avatar

Vane

8

文章

6

标签

首页
分类
  • 设计模式
  • 重新认识系列
  • 源码解析
标签
时间轴
关于
  • GitHub
  • 简书
  • 自由扩展你的项目 - Builder模式

    • Builder 模式的定义
      • Builder 模式的使用场景
        • Builder 模式的UML类图
          • Builder 模式的简单实现
            • Android 源码中的Builder模式实现
              • Builder模式实战
                • 总结

                自由扩展你的项目 - Builder模式

                vuePress-theme-reco Vane    2018 - 2020

                自由扩展你的项目 - Builder模式


                Vane 2020-04-28 面试 设计模式

                Builder 模式是一步一步创建一个复杂对象的创建型模式,它允许用户在不知道内部构建细节的情况下,可以更精细地控制对象的构造流程。该模式是为了将构建复杂对象的过程和它的部件解耦,使得构建过程和部件的表示隔离开来。

                因为一个负载的对象又很多大量组成部分,如汽车,有车轮、方向盘、发动机,还有各种小零件等,如何将这些部件装配成一辆汽车,这个装配过程很漫长,也很复杂,对于这种情况,为了在构建过程中对外部隐藏实现细节,就可以使用Builder 模式将部件和组装过程分离,使得构建过程和部件都可以自由扩展,两者之间的耦合也降到最低。

                # Builder 模式的定义

                将一个复杂对象的构建与它的表示分离,使得同样的构建过程可以创建不同的表示。

                # Builder 模式的使用场景

                1. 相同的方法,不同的执行顺序,产生不同的事件结果。
                2. 多个部件或零件,都可以装配到一个对象中,但是产生的运行结果又不相同时。
                3. 产品类非常复杂,或者产品类中的调用顺序不同产生了不同的作用,这个时候使用建造者模式非常合适。
                4. 当初始化一个对象特别复杂,如参数多,且很多参数都具有默认值时。
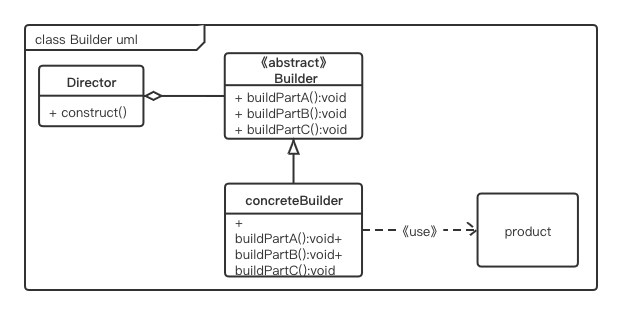
                # Builder 模式的UML类图

                UML 类图如图3-1所示。

                角色介绍:

                • Product 产品类 --- 产品的抽象类
                • Builder --- 抽象Builder类,规范产品的组件,一般是由子类实现具体的组件过程
                • ConcreteBuilder --- 具体的Builder类
                • Director --- 统一组装过程

                builder

                # Builder 模式的简单实现

                计算机的组装过程较为复杂,并且组装顺序是不固定的,为了易于理解,我们把计算机组装的过程简化为构建主机、设置操作系统、设置显示器3个部分,然后通过Director和具体的Builder来构建计算机对象。请看下面的示例:

                package com.dp.example.builder
                
                //计算机抽象类,即Product角色
                public abstract class Computer {
                    protected String mBoard;
                    protected String mDisplay;
                    protected String mOS;
                
                    protected Computer() {
                    }
                    //设置CPU核心数
                    public void setBoard(String board) {
                        mBoard = board;
                    }
                    //设置内存
                    public void setDisplay(String display) {
                        mDisplay = display;
                    }
                    //设置操作系统
                    public abstract void setOS();
                
                    @Override
                    public String toString() {
                        return "Computer [mBoard=" + mBoard + ", mDisplay=" + mDisplay + ", mOs=" + mOS + "]" ;
                    }
                }
                
                //具体的Computer 类, MacBook
                public class Macbook extends Computer {
                    protected Macbook() {
                    }
                
                    @Overrid
                    public void setOS() {
                        mOS = "Mac OS X 10.10";
                    }
                }
                
                //抽象Builder 类
                public abstract class Builder {
                    //设置主机
                    public abstract void buildBoard(String board);
                    //设置显示器
                    public abstract void buildDisplay(String display);
                    //设置操作系统
                    public abstract void buildOS();
                    //创建Computer
                    public abstract Computer create();
                }
                
                //具体的Builder类,MacbookBuilder
                public class MacbookBuilder extends Builder {
                    private Computer mComnputer = new Macbook();
                
                    @Override
                    public void buildDisplay(String display) {
                        mComputer.setDisplay(display);
                    }
                
                    @Override
                    public void buildBoard(String board) {
                        mComputer.setBoard(board);
                    }
                
                    @Override
                    public void buildOS() {
                        mComputer.setOS();
                    }
                
                    @Override
                    public Computer create() {
                        return mComputer;
                    }
                }
                
                //Director类,负责构造Computer
                public class Director {
                    Builder mBuilder = null;
                
                    /**
                     * @param builder
                     */
                    public Director(Builder builder) {
                        mBuilder = builder;
                    }
                
                    /**
                     * 构建对象
                     */
                    public void construct(String board, String display) {
                        mBuilder.buildBoard(board);
                        mBuilder.buildDisplay(display);
                        mBuilder.buildOS();
                    }
                }
                
                //测试代码
                public class Test {
                    public static void main(String[] args) {
                        //构建起
                        Builder builder = new MacbookBuilder();
                        //Director
                        Director pcDirector = new Director(builder);
                        //封装构建过程,4核、内存2GB、Mac系统
                        pcDirector.construct("英特尔主板", "Retina 显示器");
                        //构建计算机,输出相关信息
                        System.out.println("Computer Info:" + builder.create().toString());
                    }
                }
                
                
                1
                2
                3
                4
                5
                6
                7
                8
                9
                10
                11
                12
                13
                14
                15
                16
                17
                18
                19
                20
                21
                22
                23
                24
                25
                26
                27
                28
                29
                30
                31
                32
                33
                34
                35
                36
                37
                38
                39
                40
                41
                42
                43
                44
                45
                46
                47
                48
                49
                50
                51
                52
                53
                54
                55
                56
                57
                58
                59
                60
                61
                62
                63
                64
                65
                66
                67
                68
                69
                70
                71
                72
                73
                74
                75
                76
                77
                78
                79
                80
                81
                82
                83
                84
                85
                86
                87
                88
                89
                90
                91
                92
                93
                94
                95
                96
                97
                98
                99
                100
                101
                102
                103
                104
                105
                106
                107
                108
                109
                110

                输出结果:

                Computer Info: Computer [mBoard=英特尔主板, mDisplay=Retina 显示器, mOs=Mac OS X 10.10]
                
                1

                上述示例中,通过具体的 MacbookBuilder 来构建 Macbook对象,而Director封装了构建复杂产品对象的过程,对外隐藏构建细节。Builder与Director一起将一个复杂对象的构建与它的表示分离,使得同样的构建过程可以创建不同的对象。

                值得注意的是,在显示开发过程中,Director 角色经常会被省略。而直接使用一个Builder 来进行对象的组装,这个Builder通常为链式调用,它的关键点是每个setter方法都返回自身,也就是 return this,这样就使得setter方法可以链式调用,代码大致如下:

                new TestBuilder().setA("A").setB("B").create();
                
                1

                通过这种形式不仅去除了Director角色,整个结构也更加简单,也能对Product对象的组装过程更精细的控制。

                # Android 源码中的Builder模式实现

                在Android源码中,最常用到的Builder 模式就是AlertDialog.Builder,使用该Builder来构建复杂的AlertDialog对象。在开发过程中,我们经常用到AlertDialog,具体示例如下:

                //显示基本的AlertDialog
                private void showDialog(Context context) {
                    AlertDialog.Builder builder = new Alert.Builder(context);
                    builder.setIcon(R.drawable.icon);
                    builder.setTitle("title");
                    builder.setMessage("Message");
                    builder.setPositiveButton("Button1"), new DialogInterface.OnClickListener() {
                        public void onClick(DialogInterface dialog, int whichButton) {
                            setTitle("点击了对话框上的Button1");
                        }
                    };
                    builder.setNeutralButton("Button2"), new DialogInterface.OnClickListener() {
                        public void onClick(DialogInterface dialog, int whichButton) {
                            setTitle("点击了对话框上的Button2");
                        }
                    };
                    builder.setNegativeButton("Button3"), new DialogInterface.OnClickListener() {
                        public void onClick(DialogInterface dialog, int whichButton) {
                            setTitle("点击了对话框上的Button3");
                        }
                    };
                    builder.create().show(); //构建AlertDialog,并且显示
                }
                
                
                1
                2
                3
                4
                5
                6
                7
                8
                9
                10
                11
                12
                13
                14
                15
                16
                17
                18
                19
                20
                21
                22
                23
                24

                从类名就可以看出这就是一个Builder模式,通过Builder对象来组装Dialog的各个部分,如title、buttons、Message等,将Dialog的构造和表示进行分离。下面看看AlertDialog的相关源码:

                //AlertDialog
                public class AlertDialog extends Dialog implements DialogInterface {
                    //AlertController 接收 Builder成员变量P中的各个参数
                    private AlertController mAlert;
                
                    //构造函数
                    protected AlertDialog(Context context, int theme) {
                        this(context, theme, true);
                    }
                
                    //构造AlertDialog
                    AlertDialog(Context context, int theme, boolean createContextWrapper) {
                        super(context, resolveDialogTheme(context, theme), createContextWrapper);
                        mWindow.alwaysReadCloseOnTouchAttr();
                        //构造AlertController
                        mAlert = new AlertController(getContext(), this, getWindow());
                    }
                
                    //实际上调用的是mAlert 的setTitle 方法
                    @Override
                    public void setTitle(CharSequence title) {
                        super.setTitle(title);
                        mAlert.setTitle(title);
                    }
                
                    //实际上调用的是mAlert的setCustomTitle方法
                    public void setCustomTitle(View customTitleView) {
                        mAlert.setCustomTitle(customTitleView);
                    }
                
                    public void setMessage(CharSequence message) {
                        mAlert.setMessage(message);
                    }
                
                    // AlertDialog 其他的代码省略
                
                    // ********** Builder 为AlertDialog的内部类 **********
                    public static class Builder {
                        //1. 存储AlertDialog 的各个参数,如title、message、icon等
                        private final AlertController.AlertParams P;
                        // 属性省略
                        public Builder(Context context) {
                            this(context, resolveDialogTheme(context, 0));
                        }
                
                        public Builder(Context context, int theme) {
                            P = new AlertController.AlertParams(new ContextThemeWrapper(
                                context,resolveDialogTheme(context. theme)));
                            mTheme = theme;
                        }
                
                        //2. 设置各种参数
                        public Builder setTitle(CharSequence title) {
                            P.mTitle = title;
                            return this;
                        }
                
                        public Builder setMessage(CharSequence message) {
                            P.mMessage = message;
                            return this;
                        }
                
                        public Builder setView(View view) {
                            P.mView = view;
                            P.mViewSpacingSpecified = false;
                            return this;
                        }
                        //3. 构建AlertDialog,传递参数
                        public AlertDialog create() {
                            //4. 调用new AlertDialog 构造对象, 并且将参数传递给个体AlertDialog
                            final AlertDialog dialog = new AlertDialog(P.mContext,mTheme, false);
                            //5. 将P中的参数应用到dialog 中的 mAlert对象汇总
                            P.apply(dialog.mAlert);
                            dialog.setCancelable(P.mCancelable);
                            if(P.mCancelable) {
                                dialog.setCancelableOnTouchOutside(true);
                            }
                            dialog.setOnCancelListener(P.mOnCancelListener);
                            if(P.mOnKeyListener != null) {
                                dialog.setOnKeyListener(P.mOnKeyListener);
                            }
                            return dialog;
                        }
                
                    }
                }
                
                1
                2
                3
                4
                5
                6
                7
                8
                9
                10
                11
                12
                13
                14
                15
                16
                17
                18
                19
                20
                21
                22
                23
                24
                25
                26
                27
                28
                29
                30
                31
                32
                33
                34
                35
                36
                37
                38
                39
                40
                41
                42
                43
                44
                45
                46
                47
                48
                49
                50
                51
                52
                53
                54
                55
                56
                57
                58
                59
                60
                61
                62
                63
                64
                65
                66
                67
                68
                69
                70
                71
                72
                73
                74
                75
                76
                77
                78
                79
                80
                81
                82
                83
                84
                85
                86

                上述代码中,Builder类可以设置AlertDialog中的title、message、button 等参数,这些参数都存储在类型为AlertController.AlertParams的成员变量P中,AlertController.AlertParams中包含了与AlertDialog视图中对应的成员变量。在调用Builder类的create函数时会创建AlertDialog,并且将Builder成员变量P中保存的参数应用到AlertDialog 的mAlert 对象中,即P.apply(dialog.mAlert)代码段。我们再看看apply 函数的实现:

                public void apply(AlertController dialog) {
                    if(mCustomTitleView != null) {
                        dialog.setCustomTitle(mCustomTitleView);
                    }else {
                        if (mTitle != null) {
                            dialog.setTitle(mTitle);
                        }
                        if (mIcon != null) {
                            dialog.setIcon(mIcon);
                        }
                        if (mIconId >= 0) {
                            dialog.setIcon(mIconId);
                        }
                        if(mIconAttrId > 0) {
                            dialog.setIcon(dialog.getIconAttributeResId(mIconAttrId));
                        }
                    }
                    if (mMessage != null) {
                        dialog.setMessage(mMessage);
                    }
                    if(mPositiveButtonText != null) {
                        dialog.setButton(DialogInterface.BUTTON_POSITIVE, mPositiveButtonText, mPositiveButtonListener, null);
                    }
                    if(mNegativeButtonText != null) {
                        dialog.setButton(DialogInterface.BUTTON_NEGATIVE, mNegativeButtonText, mNegativeButtonListener, null);
                    }
                    if(mNeutralButtonText != null) {
                        dialog.setButton(DialogInterface.BUTTON_NEUTRAL, mNeutralButtonText, mNeutralButtonListener, null);
                    }
                    if (mForceInverseBackground) {
                        dialog.setInverseBackgroundForced(true);
                    }
                    // 如果设置了mItems, 则表示是单选或者多选列表,此时创建一个ListView
                    if ((mItems !=null) || (mCursor != null) || (mAdapter !=null)) {
                        createListView(dialog);
                    }
                    //将mView设置给Dialog
                    if (mView != null) {
                        if (mViewSpacingSpecified) {
                            dialog.setView(mView, mViewSpacingLeft, mViewSpacingTop, mViewSpacingRight, mViewSpacingBottom);
                        } else {
                            dialog.setView(mView);
                        }
                    }
                }
                
                1
                2
                3
                4
                5
                6
                7
                8
                9
                10
                11
                12
                13
                14
                15
                16
                17
                18
                19
                20
                21
                22
                23
                24
                25
                26
                27
                28
                29
                30
                31
                32
                33
                34
                35
                36
                37
                38
                39
                40
                41
                42
                43
                44
                45

                在apply函数中,只是将AlertParams参数设置到AlertController中,例如,将标题设置到Dialog对应的标题视图中,将Message 设置到内容视图中等。当我们获取到AlertDialog 对象后,通过show函数就可以显示这个对话框。我们看看Dialog 的show函数(该函数在Dialog类中):

                // 显示Dialog
                public void show() {
                    //已经是显示状态,则return
                    if(mShowing) {
                        if (mDecor != null) {
                            if (mWindow.hasFeature(Window.FEATURE_ACTION_BAR)) {
                                mWindows.invalidatePanelMenu(Window.FEATURE_ACTION_BAR);
                            }
                            mDecor.setVisibility(View.VISIBLE);
                        }
                        return;
                    }
                    mCanceled = false;
                
                    //1. OnCreate 调用
                    if (!mCreated) {
                        dispatchOnCreate(null);
                    }
                    //2. onStart
                    onStart();
                    //3. 获取DecorView
                    mDecor = mWindow.getDecorView();
                    //代码省略
                    //4. 获取布局参数
                    WindowManager.LayoutParams l = mWindow.getAttributes();
                    if ((l.softInputMode & windowManager.LayoutParams.SOFT_INPUT_FORWARD_NAVIGATION) == 0) {
                        WindowManager.LayoutParams nl = new WindowManager.LayoutParams();
                        nl.copyFrom(l);
                        nl.softInputMode = WindowManager.LayoutParams.SOFT_INPUT_FORWARD_NAVIGATION;
                        l = nl;
                    }
                
                    try {
                        // 5. 将mDecor 添加到 WindowManager 中
                        mWindowManager.addView(mDecor, 1);
                        mShowing = true;
                        //发送一个显示Dialog 的消息
                        sendShowMessage();
                    } finally {
                    }
                }
                
                1
                2
                3
                4
                5
                6
                7
                8
                9
                10
                11
                12
                13
                14
                15
                16
                17
                18
                19
                20
                21
                22
                23
                24
                25
                26
                27
                28
                29
                30
                31
                32
                33
                34
                35
                36
                37
                38
                39
                40
                41

                在show 函数中 主要做了如下几个事情:

                1. 通过dispatchOnCreate函数来调用AlertDialog 的 onCreate函数;
                2. 然后调用AlertDialog 的onStart 函数。
                3. 最后将Dialog 的DecorView 添加到WindowManager中。

                很明显,这就是一系列典型的生命周期函数。那么按照惯例,AlertDialog的内容视图构建按理应该在onCreate函数中,我们来看看是不是:

                @Override
                protected void onCreate(Bundle savedInstanceState) {
                    super.onCreate(saveInstanceState);
                    //调用了AlertController 的installContent 方法
                    mAlert.installContent();
                }
                
                1
                2
                3
                4
                5
                6

                在onCreate函数中主要调用了AlertController的 installContent 方法,Dialog中的onCreate函数只是一个空实现而已,可以忽略它。那么AlertDialog的内容视图必然就在installContent函数中,继续深入了解吧:

                public void installContent() {
                    /*设置窗口,没有Title */
                    mWindow.requestFeature(Window.FEATURE_NO_TITLE);
                    //省略其他设置
                    //设置窗口的内容视图布局
                    mWindow.setContentView(mAlertDialogLayout);
                    //初始化AlertDialog 其他子视图的内容
                    setupView();
                }
                
                1
                2
                3
                4
                5
                6
                7
                8
                9

                installContent函数的代码很少,但极为重要,它调用了Window对象的setContentView,这个setContentView就与Activity中的一模一样,实际上Activity最终也是调用Window对象的setContentView 函数。因此,这里就是AlertDialog的内容布局,这个布局就是mAlertDialogLayout字段的值,这个值在AlertController 构造函数中进行了初始化,具体代码如下:

                public AlertController(Context context, DialogInterface di, Window window) {
                    //代码省略
                    TypeArray a = context.obtainStyleedAttributes(null, 
                    com.android.internal.R.styleable.AlertDialog,
                    com.android.internal.R.attr.alertDialogStyle, 0);
                    AlertDialogLayout = a.getResourceId(
                        com.android.internal.R.styleable.AlertDialog_layout,
                        com.android.internal.R.layout.alert_dialog);
                    //代码省略
                    a.recycle();
                }
                
                1
                2
                3
                4
                5
                6
                7
                8
                9
                10
                11

                从AlertController 的构造函数中可以看到,AlertDialog的布局资源就是alert_dialog.xml 这个文件,由于这个布局文件有点长,我们就不附上源代码,用下图来大致描述一下它的结构。

                AlertDialog

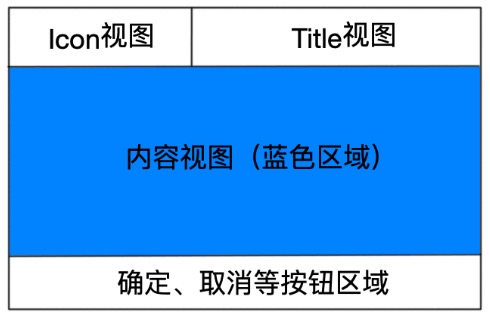
                当通过Builder 对象的setTitle、setMessage 等方法设置具体内容时,就是将这些内容填充到对应的视图中。而AlertDialog也允许你通过setView传入内容视图,这个内容视图就是替换掉上图的蓝色区域,AlertDialog预留了一个costumePanel区域用来显示用户自定义的内容视图。我们来看看setupView函数:

                private void setupView() {
                    //1. 获取并初始化内容区域
                    LinearLayout contentPanel = (LinearLayout)mWindow.findViewById(R.id.contentPanel);
                    setupContent(contentPanel);
                    //2. 初始化按钮
                    boolean hasButton = setupButton();
                    //3. 获取并初始化Title区域
                    LinearLayout topPanel = mWindow.findViewById(R.id.topPanel);
                    TypeArray a = mContext.obtainStyledAttributes(null, 
                    com.android.internal.R.styleable.AlertDialog,
                    com.android.internal.R.attr.alertDialogStyle, 0);
                    boolean hasTitle = setupTitle(topPanel);
                    // 按钮区域的可见性
                    View buttonPanel = mWindow.findViewById(R.id.buttonPanel);
                    if (!hasButton) {
                        buttonPanel.setVisibility(View.GONE);
                        mWindow.setCloseOnTouchOutsideIfNotSet(true);
                    }  
                    //4. 自定义内容视图区域
                    FrameLayout customPanel = null;
                    //如果用户设置了内容区域,那么将它显示在customPanel的custom布局里面
                    if (mView != null ){
                        customPanel = (FrameLayout)mWindow.findViewById(R.id.customPanel);
                        FrameLayout custom = mWindow.findViewById(R.id.custom);
                        //显示用户设置的视图
                        custom.addView(mView, new LayoutParams(MATCH_PARENT, MATCH_PARENT));
                        if (mViewSpacingSpecified) {
                            custom.setPadding(mViewSpacingLeft, mViewSpacingTop, mViewSpacingRight, mViewSpacingBottom);
                        }
                        if (mListView != null) {
                            ((LinearLayout.LayoutParams) customPanel.getLayoutParams()).weight = 0;
                        }
                    } else {
                        mWindow.findViewById(R.id.customPanel).setVisibility(View.GONE);
                    }
                    //代码省略
                    //设置北京
                    setBackground(topPanel, contentPanel, customPanel, hasButtons, a, hasTitle, buttonPanel);
                    a.recycle();
                }
                
                1
                2
                3
                4
                5
                6
                7
                8
                9
                10
                11
                12
                13
                14
                15
                16
                17
                18
                19
                20
                21
                22
                23
                24
                25
                26
                27
                28
                29
                30
                31
                32
                33
                34
                35
                36
                37
                38
                39
                40

                这个setupView顾名思义就是初始化AlertDialog布局中的各个部分,如标题区域、按钮区域、内容区域等,在该函数调用之后整个Dialog的视图内容全部设置完毕。而这些各区域的视图都属于mAlertDialogLayout 布局中的子元素,Window对象又关联了mAlertDialogLayout的整个布局树,当调用完setupView之后整个视图树的数据都填充完毕,当用户调用show函数时,WindowManager会将Window对象的DecorView(也就是mAlertDialogLayout对应的视图,当然DecorView 还有一个层次,我们不做过多讨论)添加到用户的窗口上,并且显示出来。至此,整个Dialog就出现在用户的视野中了!

                在AlertDialog的Builder模式中并没有看到Director角色的出现,其实在很多场景中,Android并没有完全按照GOF在《设计模式:可服用面向对象软件的基础》一书中描述的经典模式实现来做,而是做了一些修改,使得这个模式更易于使用。这里的ALertDialog.Builder 同时扮演来上文中提到的builder、ConcreteBuilder、Director的角色,简化来Builder模式的设计。当模块比较稳定,不存在一些变化时,可以在经典模式实现的基础上作出一些精简,而不是照搬GOF上的经典实现,更不要生搬硬套,使程序失去架构之美。正是由于灵活地运用设计模式,Android的源码很值得我们去学习。

                # Builder模式实战

                随着ImageLoader的不断演进,这个库的可扩展性、灵活性越来越高,在带来用户关注的同时也需要开发一些新特性来满足用户的需求,比较典型的问题就是配置ImageLoader,如缓存配置等,这还远远不够! 用户需要更大的灵活性,更多的定制化,如设置图片在加载时ImageView显示的图片、加载失败后显示的图片、图片加载引擎线程数等。

                public class ImageLoader {
                    // 图片缓存
                    ImageCache mImageCache = new MemoryCache();
                    //图片加载中显示的图片id 
                    int mLoadingImageId;
                    //图片加载失败时显示的图片id
                    int mLoadingFailedImageId;
                    //图片加载策略
                    LoaderPolicy mLoaderPolicy;
                    //线程池,线程数量为CPU的数量
                    ExecutorService mExecutorService = Executors.newFixedThreadPool(Runtime.
                    getRuntime().availableProcessors());
                    //省略单例模式部分代码
                    public void displayImage(String imageUrl, ImageView imageView) {
                        Bitmap bitmap = mImageCache.get(imageUrl);
                        if (bitmap != null) {
                            imageView.setImageBitmap(bitmap);
                            return;
                        }
                        //提交图片加载请求
                        submitLoadRequest(imageUrl, imageView);
                    }
                    public void setImageCache(ImageCache cache) {
                        mImageCache = cache;
                    }
                    public void setLoadingImage(int resId) {
                        mLoadingImageId = resId;
                    }
                    public void setLoadingFailedImage(int resId) {
                        mLoadingFailedImageId = resId;
                    }
                    public void setLoadingPolicy(LoaderPolicy policy) {
                        mLoaderPolicy = policy;
                    }
                
                    public void setThreadCount(int count) {
                        mExecutorService.shutDown();
                        mExecutorService = null;
                        //设置新的线程数量
                        mExecutorService = Executors.newFixedThreadPool(count);
                    }
                
                    private void submitLoadRequest(final String imageUrl, final ImageView imageView) {
                        //设置加载中的图片
                        imageView.setImageResource(mLoadingImageId);
                
                        imageView.setTag(imageUrl);
                        mExecutorService.submit(new Runnable() {
                            @Override
                            public void run() {
                                //加载图片
                                Bitmap bitmap = downloadImage(imageUrl);
                                if (bitmap == null) {
                                    //设置加载图片失败后显示的图片
                                    imageView.setImageResource(mLiadingFailedImageId);
                                    return;
                                }
                                //显示加载到的图片
                            }
                        });
                    }
                
                    public Bitmap downloadImage(String imageUrl) {
                        Bitmap bitmap = null;
                        //省略下载图片的过程
                        return bitmap;
                    }
                }
                
                1
                2
                3
                4
                5
                6
                7
                8
                9
                10
                11
                12
                13
                14
                15
                16
                17
                18
                19
                20
                21
                22
                23
                24
                25
                26
                27
                28
                29
                30
                31
                32
                33
                34
                35
                36
                37
                38
                39
                40
                41
                42
                43
                44
                45
                46
                47
                48
                49
                50
                51
                52
                53
                54
                55
                56
                57
                58
                59
                60
                61
                62
                63
                64
                65
                66
                67
                68

                这段代码就是创建对应的成员变量,然后通过setter方法来设置这些变量值,使得这些特性都能够被用户定制。看似很好用,代码简单、灵活性好,但是ImageLoader里的函数较多,且用户可以在任何时候修改ImageLoader的配置,这就出现了一个问题,如在已经初始化了一个指定线程数量的线程池的情况下,用户再调用setThreadCount时应该如何处理呢?而且这样的设计也使得用户的使用成本变高。里面过多的函数暴露,也让用户在每次调用函数时都要仔细选择,你能否对这个程序做一些限制,比如用户只能在初始化时配置这些参数?我们来看看知名图片加载库 Universal-Image-Loader 的初始化配置是怎么写的:

                ImageLoaderConfiguration config = new ImageLoaderConfiguration.Builder(context)
                        .threadPriority(Thread.NORM_PRIORITY - 2)
                        .denyCacheImageMultipleSizesInMemory()
                        .discCacheFileNameGenerator(new Md5FileNameGenerator())
                        .tasksProcessingOrder(QueueProcessingType.LIFO)
                        .writeDebugLogs() // Remove for release app
                        .build();
                
                //初始化ImageLoader
                ImageLoader.getInstance().init(config);
                
                1
                2
                3
                4
                5
                6
                7
                8
                9
                10

                “将一个复杂对象的构建与他的表示分离”,用Builder模式来构建一个不可变的配置对象,并且将这个配置对象注入到ImageLoader中,也就是说它只能在构建时设置各个参数,一旦你调用build()或者类似方法构建对象之后,它的属性就不可再修改,因为它没有setter方法,字段也都是隐藏的,用户只能在初始化时一次性构造这个配置对象,然后注入给ImageLoader,ImageLoader根据配置对象进行初始化。这样,上一个版本中的setThreadCount、setImageCache等方法就不需要出现在ImageLoader中了,用户可见的函数就会少很多,ImageLoader的使用成本也随之降低了。

                我们看看修改后的ImageLoader,具体代码如下:

                public final class ImageLoader {
                    //图片加载配置对象
                    private ImageLoaderConfig mConfig;
                
                    //省略单例模式的代码
                
                    /**
                     * 初始化ImageLoader
                     * @param config
                     */
                    public void init(ImageLoaderConfig config) {
                        mConfig = config;
                        //检测配置的合法性,内部会根据配置做一些初始化操作
                        checkConfig();
                        //代码省略
                    }
                    //加载图片的函数
                    public void displayImage(String imageUrl, ImageView imageView) {
                        Bitmap bitmap = mImageCache.get(imageUrl);
                        if (bitmap != null) {
                            imageView.setImageBitmap(bitmap);
                            return;
                        }
                        // 添加加载请求
                        submitLoadRequest(imageurl, imageView);
                    }
                
                    private void submitLoadRequest(final String imageUrl, final ImageView imageView) {
                        //代码省略
                    }
                    public Bitmap downloadImage(String imageUrl) {
                        Bitmap bitmap = null;
                        //代码省略
                        return bitmap;        
                    }
                }
                
                1
                2
                3
                4
                5
                6
                7
                8
                9
                10
                11
                12
                13
                14
                15
                16
                17
                18
                19
                20
                21
                22
                23
                24
                25
                26
                27
                28
                29
                30
                31
                32
                33
                34
                35
                36

                上述代码中,把配置的代码基本上都封装到ImageLoaderConfig 和 Builder对象中,一起来看看相关代码:

                public class ImageLoaderConfig {
                    //图片缓存配置对象
                    BitmapCache bitmapCache = new MemoryCache();
                    //加载图片时的loading 和加载失败的图片配置对象
                    DisplayConfig displayConfig = new DisplayConfig();
                    //加载策略
                    LoadPolicy loadPolicy = new SerialPolicy();
                    //线程数量,默认为CPU数量+1
                    int threadCount = Runtime.getRuntime().availableProcessors() + 1;
                    private ImageLoaderConfig() {
                    }
                
                    /**
                     * 配置类的Builder
                     */
                    public static class Builder {
                        /**
                         * 图片缓存配置对象 
                         */
                        BitmapCache bitmapCache = new MemoryCache();
                        /**
                         * 加载图片时的loading和加载失败的图片配置对象
                         */
                        DisplayConfig displayConfig = new DisplayConfig();
                        /**
                         * 加载策略
                         */
                        LoadPolicy loadPolicy = new SerialPolicy();
                        //线程数量
                        int threadCount = Runtime.getRuntime().availableProcessors() +1;
                        //设置线程数量
                        public Builder setThreadCount(int count) {
                            threadCount = Math.max(1, count);
                            return this;
                        }
                        //设置缓存
                        public Builder setCache(BitmapCahce cache) {
                            bitmapCache = cache;
                            return this;
                        }
                        //设置图片加载中显示的图片
                        public Builder setLoadingPlaceholder(int resId) {
                            displayConfig.loadingResId = resId;
                        }
                        //设置图片加载失败时显示的图片
                        public Builder setNotFoundPlaceholder(int resId) {
                            displayConfig.failedResId = resId;
                        }
                        public Builder setLoadPolicy(LoadPolicy policy) {
                            if (policy != null) {
                                loadPolicy = policy;
                            }
                            return this;
                        }
                        void applyConfig(ImageLoaderConfig config) {
                            config.bitmapCache = this.bitmapCache;
                            config.displayConfig = this.displayConfig;
                            config.loadPolicy = this.loadPolicy;
                            config.threadCount = this.threadCount;
                        }
                        /**
                         * 根据已经设置好的属性创建配置对象
                         * @return ImageLoaderConfig对象
                         */
                        public ImageLoaderConfig create() {
                            ImageLoaderConfig config = new ImageLoaderConfig();
                            //应用配置
                            applyConfig(config);
                            return config;
                        }
                    }
                }
                
                1
                2
                3
                4
                5
                6
                7
                8
                9
                10
                11
                12
                13
                14
                15
                16
                17
                18
                19
                20
                21
                22
                23
                24
                25
                26
                27
                28
                29
                30
                31
                32
                33
                34
                35
                36
                37
                38
                39
                40
                41
                42
                43
                44
                45
                46
                47
                48
                49
                50
                51
                52
                53
                54
                55
                56
                57
                58
                59
                60
                61
                62
                63
                64
                65
                66
                67
                68
                69
                70
                71
                72

                通过将ImageLoaderConfig 的构造函数、字段私有化,使得外部不能访问内部属性,用户唯一能够设置属性的地方就是通过Builder对象了,也就是说用户只能通过Builder对象构造ImageLoaderConfig对象,这就是构建和表示相分离。

                但是“使得相同的构造过程可以创建不同的表示” 又是如何理解呢? 在经典的Builder模式中还有一个Director 和ConcreteBuilder角色,不同的ConcreteBuilder是可以创建不同的Product子类的,因此,也就是可以创建不同的表示。我们这里并没有使用经典实现,因此,不做过多的描述。

                我们来看看使用Builder模式重构后的ImageLoader如何使用:

                private void initImageLoader() {
                    ImageLoaderConfig config = new ImageLoaderConfig.Builder()
                        .setLoadingPlaceholder(R.drawable.loading)
                        .setNotFoundPlaceholder(R.drawable.not_found)
                        .setCache(new DoubleCache(this))
                        .setThreadCount(4)
                        .setLoadPolicy(new ReversePolicy()).create();
                    //将配置初始化到ImageLoader中
                    ImageLoader.getInstance().init(config);
                }
                
                1
                2
                3
                4
                5
                6
                7
                8
                9
                10

                调用init函数之后,ImageLoader就可以正常使用了,各种setter函数不会在用户调用ImageLoader方法时出现在视野中,他们已经被隔离到了Builder模式中。

                # 总结

                Builder模式在Android开发中也较为常用,通常作为配置类的构建器将配置的构建和表示分离开来,同时也是将配置从目标类中隔离出来,避免过多的setter方法。Builder模式比较常见的实现形式是通过调用链实现,这样使得代码更简洁、易懂,例如上文说到的ImageLoader就是通过ImageLoaderConfig进行配置,这样避免了目标类中被过多的接口“污染”。

                优点

                1. 良好的封装性,使用建造者模式可以使客户端不必知道产品内部组成的细节。
                2. 建造者独立,容易扩展。

                缺点

                会产生多余的Builder对象以及Director 对象,消耗内存。

                本文转载自《Android源码设计模式解析与实战》一书,手敲一遍,加深印象。原作者在这